Subscribe:

Receive all updates via Facebook. Just Click the Like Button Below...

Powered By EXEIdeas

Showing posts with label PC Tricks. Show all posts

Friday, April 12, 2013

Clean your RAM without any software

Clean your RAM without any software


RAM decides the speed of your computer, there are many software available in internet to keep your RAM free, but how much of these software supports to keep your RAM Free?
And now I am going to show you something very easy to keep your RAM free. It’s all few lines of code which can be used with notepad.


You can do this simple trick by following the steps below.

Open Notepad.

Type FreeMem=Space(64000000)

Save it as “CLEANER.VBS” in any location you like.

You can edit the code 64000000 into 512 if you own a 512 MB RAM or change into any size of RAM of your PC (Convert your RAM value to bytes).

And now run it.
-->

How to Hide any Local Drive using Command prompt


Today Computer World tutorial is about how to hide a local drive without any 3rd party software. There are lots of free and payable software's available to hide local drive, but I'm not gonna talk about hide a local drive using a software. In this tutorial I'll show you an easiest way to hide local drive without using software. This will save your both money and time.


There are 3 methods available to hide a local drive without using any software

1. Hide a drive through gpedit
2. Hide a drive through regedit
3. Hide a drive using command prompt

Today we are covering command prompt way of doing it. So lets see how to do.


How to Hide a Local Drive using command prompt?

1. Click on Start - Run

2. In Run box type cmd and hit Enter. Now Command Prompt window will appear.

3. In command prompt, type diskpart and hit Enter.

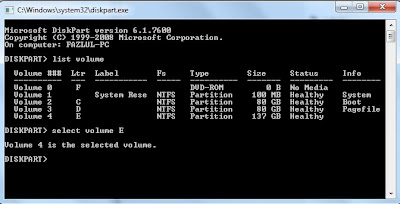
4. Then type list volume and hit Enter.

Now it will display the list of all your computer drives details.


5. Then type the Drive Letter which you want to hide.
If you want to hide volume E, type select volume E and hit Enter.

Now follow mentioned massage will appear to you.
Volume 4 is the selected volume

How to Hide any Local Drive using Command prompt

6. After that, type remove letter E and hit an Enter. 

That's all, you have done. Now restart your computer once. When you start your PC again, you want be able to see the
 particular drive in My Computer.


How to get back Hidden Drive again in My Computer.

Do the procedure which i have mentioned in step 1,2,3,4 and 5 again.

Click Start --> Run --> cmd -->

Then type diskpart - list volume - select volume E

After that type assign letter E and hit Enter.

That's all !! You have got back the hidden local drive. Once again restart your PC, now you will be able to see hidden local drive in My Computer.

Note: Your PC doesn't lost any data by doing this trick .

How to make Windows 7 Genuine using Command Prompt

make Windows 7 Genuine using Command Prompt


How many of you using Genuine windows 7 ?
we all know that everyone can't buy a genuine windows 7, because cost is too high.
Lots of Windows 7 users have experienced the error message that "Windows 7 is not genuine". 
This error message comes if you use pirated or OEM versions of Windows 7.

If windows 7 is not genuine, even you can't change the background wallpaper or any other display related 
option on your PC.

So now i'm going to show you a easy way to make your windows 7 genuine using command prompt.

How to make Windows 7 genuine using Command Prompt

Press Windows key + R
Now "run" box will appear , in "run" box type CMD 
Click on OK
Note : Run CMD as Administrator 

make Windows 7 Genuine using Command Prompt

Now command prompt will appear

In command prompt type SLMGR -REARM
Hit Enter.

make Windows 7 Genuine using Command Prompt

Wait 5-10 seconds

Now a message will appear as shown in image below.

make Windows 7 Genuine using Command Prompt


Done !!!
Now your Windows 7 is genuine .. :D
Restart your PC once. Hereafter you won't see the warning message that "Windows 7 is not genuine"

How to Recover Hidden Files From Virus Infected USB Pendrive without any Software


We are using USB pen drives for data transfer between computers. It's very important to keep your data always with you. When you're using pen drives, the biggest problem is Viruses. Mostly pen drives doesn't consist any security measures. So viruses and malwares can attack our pen drive easily. If virus attacks your pen drive, it hides the all the files and creates .exe 
extension to replace the hidden files.

Normally you can view hidden files by clicking
Folder Options -->
View -->
Show Hidden Files and Folders

But this simple method doesn't work when your pen drive is attacked by harmful viruses.


So here I'll provide you an easiest method to view your infected files from pen drive without using any software.

Insert pen drive into computer and find drive letter of connected USB drive
For Example, E:

Now click on Start --> Run

In Run box, type cmd and hit Enter

Now command prompt will appear, in command prompt type the drive letter of your pen drive and hit Enter.
Example type E:

After that, type attrib -s -h /s /d *.*


How to Recover Hidden Files From Virus Infected USB Pendrive using Command Prompt

Now hit Enter and wait for sometime. That's all, you have done !!! Now you can view all your files in pen drive without any problems.

Saturday, March 23, 2013

How To Install Windows XP With USB Drive


This tutorial will explain how to install windows xp with usb drive. Screenshots provided to make make bootable usb and copy windows xp installer.


If you are thinking to install xp from usb boot. Then you are at right place. I’ll show step by step how to boot windows xp from usb. Installing windows xp with usb is very simple. All screenshots are given to show you how to install windows xp. You’ll only need windows XP iso aur windows XP CD. Secondly a usb drive of atleast 1 GB is required for windows xp on usb.

How To install Windows XP From USB

You’ll need WinToFlash tool to make bootable USB and install windows xp from usb.

Easy Steps to Install Windows XP With USB Drive

Open WinToFlash software this will help you to install windows XP.


Once the software is opened Follow below screenshot. If you have windows XP ISO then mount image to Virtual drive using ultraISO. If ultraiso is not installed then you can download ultraiso from here. Otherwise if you have Windows XP CD then insert into your CD rom.


The WinToFlash supports both CD and ISO File to be read as disk image and copy that to drive letter. The procedure is mentioned in below screenshot.


For example in my case Drive E contains Windows XP ISO image mounted. whereas F drive is my usb. Then Click Next button and your USB pen drive will be formatted. This tool will make usb bootable and will install windows XP on usb drive. Once the process is 100% then you can reboot computer and boot XP from USB.
If you hit any errors during installation of XP via USB then please comment here. This tool also supports installation of Windows 8 and Windows 7. However you can also find complete tutorial to  Windows 7 from USB.
-->

Wednesday, March 20, 2013

Download Youtube Videos with IDM Using Proxy

If youtube is blocked in any country then you can still download youtube videos. In this tutorial I’ll share the steps to download youtube videos.

How to Download Youtube Videos

Now when Youtube is blocked in some countries. People often use proxy tools (Ultrasurf, Hotspot sheild or hide ip). Then many people are facing issues while download from youtube by IDM. Because IDM needs to be configured to download youtube videos when on proxy.

Youtube Downloader Steps

if you haven’t install IDM then first you need to install it. You can download IDM from this link.
If you are not already using any proxy then I suggest you to Install Ultrasurf.
Make sure IDM is registered. You can follow steps in read me document of its folder.
Run Ultrasurf and wait until it is connected.
Open IDM and go to Option button.
Click the “Proxy/Socks” Tab and hit button “Get From IE”
Then press OK and Close the options.
Now Open Youtube in browser.
You’ll see IDM link on corner of youtube video. Click it and youtube video downloading will begin successfully.
If you hit any issues while downloading video from youtube let me know.

Friday, March 8, 2013

Windows 7 USB Installation

This tutorial is about Windows 7 USB Installation. Below are steps with screenshot. No CD is required. All you need is a usb flash drive of atleast 4GB and Windows 7 iso file.

Windows 7 USB Installation


First of all Download this program. This is Microsoft genuine tool to make usb drive bootable


After you have downloaded above Windows 7 USB tool. Now follow below steps.
Open this tool from your programs.

Windows 7 USB Installation

Then Click on Browse button and go to path where your windows iso file is located.

Windows 7 USB Installation

Click on WIndows 7 iso file and click on Open button.

Windows 7 USB Installation

Now from options click on USB Device.

Windows 7 USB Installation

From Drop Down box select your USB Pen drive letter e.g. H: or I: or G: and then click Begin copying. After the process is completed the USB is now bootable.
Turn off your computer and plugin USB. Now Turn on PC and boot from USB. Done.

Sunday, August 26, 2012

How To Make Bootable USB Through CMD


Having a bootable USB is very essential, especially if you are a Netbook user. Using bootable USB to install an operating system (OS) not only makes the installation faster, but also saves a DVD.
Creating or using an USB drive to install Windows operating systems is very easy if you follow the below mentioned steps:

Note that this bootable USB guide will not work if you are trying to make a bootable USB on XP computer.

Coming back to bootable USB guide, here we assume that you are using either Vista or Windows 7 to create a bootable USB.
1. Insert your USB (4GB+ preferable) stick to the system and backup all the data from the USB as we are going to format the USB to make it as bootable.
2. Open elevated Command Prompt. To do this, type in CMD in Start menu search field and hitCtrl + Shift + Enter. Alternatively, navigate to Start > All programs >Accessories > right click on Command Prompt and select run as administrator.
3. When the Command Prompt opens, enter the following command:
DISKPART and hit enter.
LIST DISK and hit enter.
Once you enter the LIST DISK command, it will show the disk number of your USB drive. In the below image my USB drive disk no is Disk 2.
4. In this step you need to enter all the below commands one by one and hit enter. As these commands are self explanatory, you can easily guess what these commands do.
SELECT DISK 2
CLEAN
CREATE PARTITION PRIMARY
SELECT PARTITION
ACTIVE
FORMAT FS=NTFS
(Format process may take few seconds)
ASSIGN
EXIT
 

Don’t close the command prompt as we need to execute one more command at the next step. Just minimize it.
5. Insert your Windows DVD in the optical drive and note down the drive letter of the optical drive and USB media. Here I use “J” as my optical (DVD) drive letter and “M” as my USB drive letter.
6. Go back to command prompt and execute the following commands:
J:CD BOOT and hit enter. Where “J” is your DVD drive letter.
CD BOOT and hit enter to see the below message.
BOOTSECT.EXE/NT60 M:
(Where “M” is your USB drive letter)
 

7. Copy Windows DVD contents to USB.
You are done with your bootable USB. You can now use this bootable USB as bootable DVD on any computer that comes with USB boot feature (most of the current motherboards support this feature).

Note: If you are not able to boot after following this guide means you haven’t set the BIOS priority to USB. If you got any problem in following this guide feel free to ask questions by leaving comment.


How to Make an Application Portable

 
Ever wanted to use your programs on the go? Not want to install your favorite programs on other computers. Try this little moderately simple trick to use your favorite programs easily from your flash drive, mp3 player, or external hard drive.

Instructions 
1. The first thing you are going to need to do is download two programs, Universal Extractor and WinRar. To download the Universal Extractor Goto These Links
For Universal Extractor: Click Here To Download!!!
2. After your program is downloaded Installed Both of The Program.
After installing goto to setup file of the application that you want to make Portable and right-click on the setup file. If you have properly installed Universal Extractor Click On uniextract to subdir. A command prompt will open and it will automatically extract to a folder, on your desktop or wherever you want to save it.
 
 3. Open the folder, and search for the folder which contains the executable file that opens the application(you can test it to make sure it works properly). Highlight all of the files needed for the program in that folder. Right-click, and click on add to archive.
4.  Change the archive name to whatever you want, such as: Audacity Portable. Click on create SFX archive. Choose "best" under the category "Compression Method".
5.   Go to the advanced tab. Click on SFX options. When the options window comes up, type the name of the executable (Audacity.exe) in "Run After Extraction" in the SetUp Program category. In the Modes tab, click on unpack to temporary folder and Also check on the hide all. In the Update tab, click on "Overwrite All Files".
6.  Click OK to exit both windows. If all has gone correctly, it should create a single executable file that you can copy to your flash drive, mp3 player, or external hard drive and use from any computer you choose.


Convert Windows XP SP2 into SP3 without any setup program: Simple trick

These days the technology is changing very rapidly and with in a short span of time we have to update with the new patches ans supplement for several software, though these are always in the favor of the end user but most of the time we just don’t want to implement these latest changes. Like me, I wanted to install Microsoft Visual studio 2010, which requires windows SP3 installed to run it but I just don’t want to do so. So should i left it or there are any alternatives… Yes I have found one… And it is described below:

As for most of the programs they usually look into the info about the system status into the registry file to locate the software and patches which decides their performance. So here is the trick to fool such programs which requires Windows XP SP3 patch by altering the Windows XP SP2 version info. To do so go to windows run command (Using windows key +R) and then, typeregedit to open Registry Editor And Click on the HKEY_LOCAL_MACHINE.


So now you have registry editor opened then only browse to the following key:

Now follow These steps to goto the KEY
HKEY_LOCAL_MACHINE\SYSTEM\ CurrentControlSet\ Control\ Windows
 
System>CurrentControlSet>Control


Control>Windows

Double Click on the CSDVersion that is on the Right side
and modify “CSDVersion” from “0×00000200” (SP2) to the Windows XP SP3 value of “0×00000300” and reboot

Change the Value From 200 To 300 And Reboot To see the changes


Related Posts Plugin for WordPress, Blogger...